To keep your site up-to-date and functional, you must need to go through some maintenance. While doing those maintenance tasks your site may appear as broken to your visitors and hampers your user experience. To avoid such a situation you can enable maintenance mode. Whether you are redesigning the site, fixing a back-end issue or making an update, maintenance mode allows you to display a user-friendly notice to visitors while developing, updating, or resolving issues on your WordPress website. Want to know how?
There are many different ways to do so. In this article, we are going to show you 2 different ways you can put your WordPress site in maintenance mode. Before that, let’s discuss what is WordPress maintenance mode and when you should enable WordPress maintenance mode.
What is WordPress Maintenance Mode?
As we mentioned before, WordPress maintenance mode is a status applied to a website when you’re working on any significant changes that potentially break it. It takes your website temporarily offline, which prevents visitors from accessing broken or unfinished content. This means users won’t get access to your website, some functions or some pages. If you’re working on a specific page, you can also enable the WordPress maintenance setting mode for that specific page.
Through this, you can write a message in a friendly tone explaining why your site is in maintenance mode, when it will be back online, and what users should do in the meantime. After the construction process is complete, you can set WordPress to delete the maintenance file, and your website will work as usual.
When to Enable WordPress Maintenance Mode?
A broken site not only causes a poor user experience but also questions your professionalism or credibility. Even if you don’t activate the maintenance mode while site construction, search engines will consider your site’s downtime and return a ‘Not Found’ message to users. Which could hurt various factors for SEO. So if you’re making or changing something that affects the site’s functionality, it is wise to enable WordPress maintenance mode.
Here are several situations when you would want to enable a WordPress site in maintenance mode.
- While updating plugins, themes, or WordPress itself.
- Adding new elements to a main page
- While editing the content.
- Making structural changes to the site.
- While your site is in the development stage before it’s launched.
- Editing your site’s code or core files
- Troubleshooting errors or conflicts on your site
- Cleaning up damage resulting from a security breach
- Fixing a bug
- Launching a new product or service
How to Enable WordPress Maintenance Mode?
There are multiple ways to enable WordPress maintenance mode on your site. But not all of them are safe and easy. In this section, we’ll discuss the best two options to enable WordPress maintenance mode on your site. One is using a plugin and another one is by adding code to function.php file. Choose the one you prefer, but we recommend using the plugin to avoid any risk.
Using SeedProd Plugin:
One of the best and easiest ways to put your WordPress site in maintenance mode is by using the SeedProd plugin. This plugin offers a number of customizable maintenance, coming soon and other WordPress page templates to choose from.
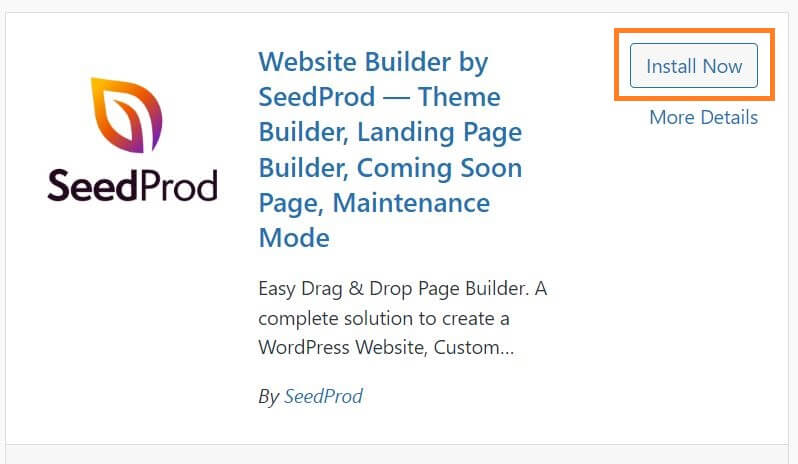
To get started with SeedProd, install and activate the plugin.
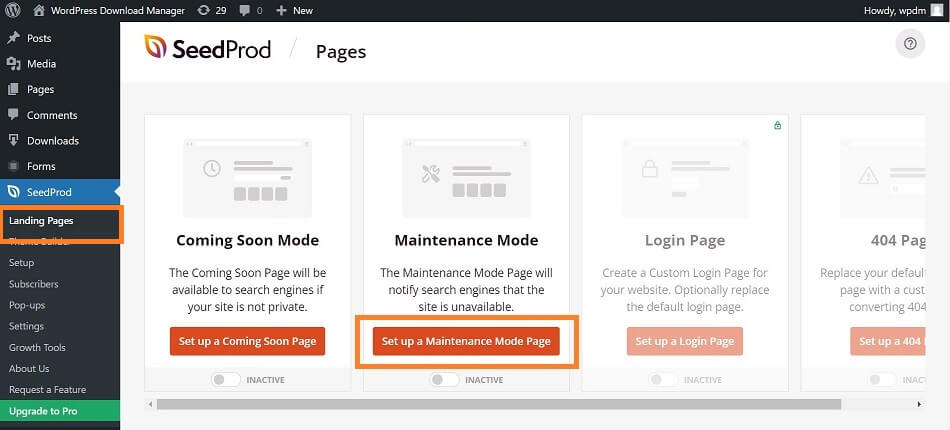
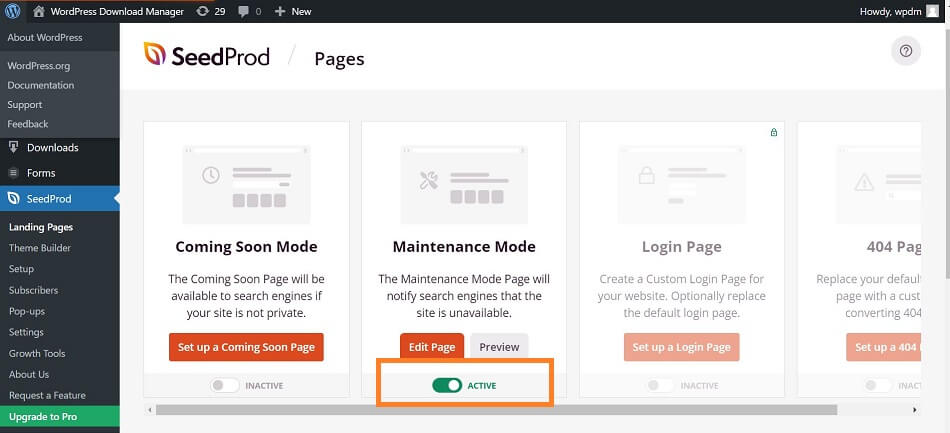
After activation, the SeedProd menu will be added to your admin dashboard. Go to “SeedProd > Landing Pages” and click on the “Set up a Maintenance Mode Page” button in the “Maintenance Mode” section.
Now, you will be taken to the page where you can customize the maintenance page. here you can choose a template or you can build your page from scratch.
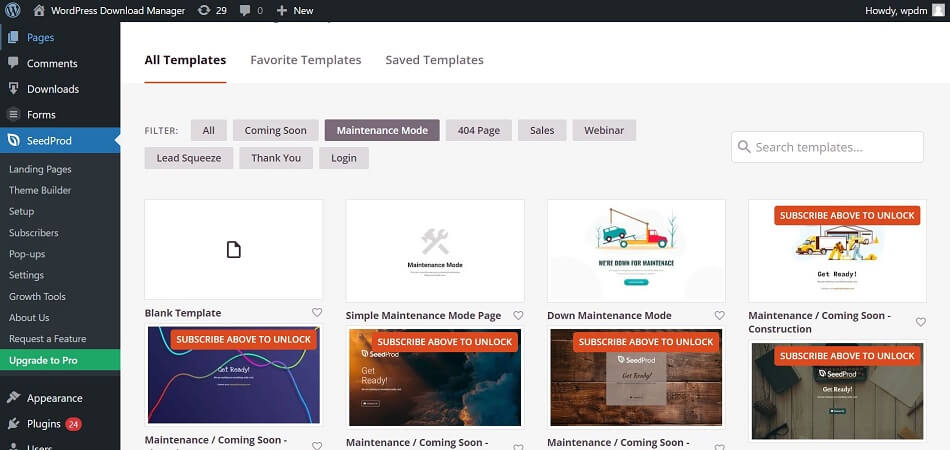
To select a template, simply hover your mouse over that template and click on the “checkmark” icon.
It will take you to the drag-and-drop builder, where you can start customizing the maintenance mode page. On the left side, you’ll see blocks and sections that you can add to your maintenance page on the right side the live preview.
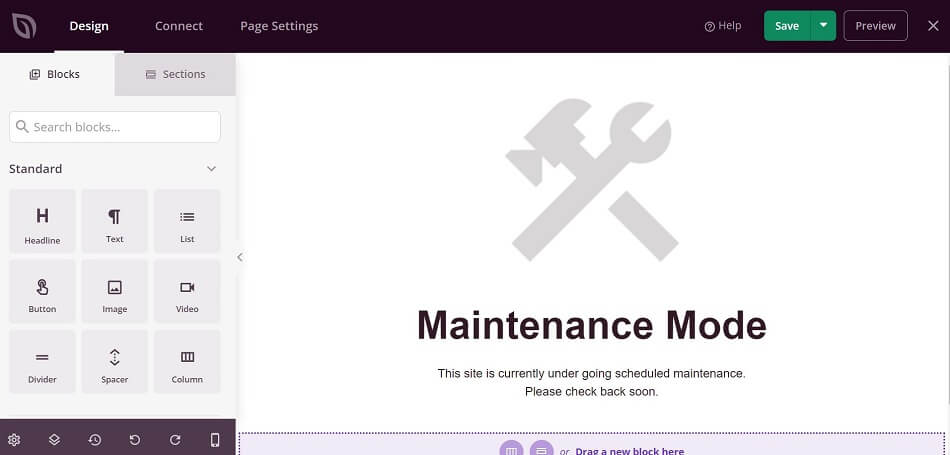
Now, if you want to add your logos or background, email sign-up form, social media sharing buttons, and a countdown timer.
When you’re done with the maintenance page customization, just click the ‘Save’ button.
The final step is to activate the WordPress maintenance mode. To do this, simply go to “SeedProd > Landing Pages”, and set the toggle at the bottom to “Active” in the “Maintenance Mode” section.
Finally, you have activated the WordPress maintenance mode. Now, to check if the maintenance mode is working, visit your website in an incognito browser tab.
To deactivate the maintenance mode, switch off the “Active” button.
Using Custom Function:
You can also display a basic maintenance splash page on your site, by adding a bit of code to your functions.php file. If you want to limit the number of plugins you use on your site, this method is for you. But we don’t recommend this method to beginners. Also, as this method involves editing one of your site’s core files, don’t forget to backing up your website before attempting this.
Start with, Navigating “Appearance > Theme Editor” in your WordPress dashboard. Then, select functions.php from the options available in the right-hand menu.
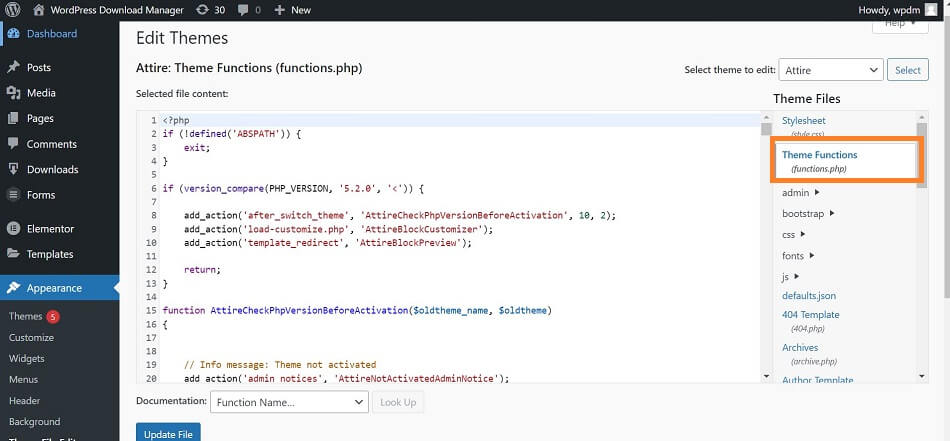
Now, scroll to the bottom of the functions.php file and copy and paste the following code snippet:
// Activate WordPress Maintenance Mode
function wp_maintenance_mode() {
if (!current_user_can(‘edit_themes’) || !is_user_logged_in()) {
wp_die(‘<h1>Under Maintenance</h1><br />Website under planned maintenance. Please check back later.’);
}
}
add_action(‘get_header’, ‘wp_maintenance_mode’);
You can customize the maintenance mode message by adding your own words. Just replace this bit with your own wording:
<h1>Under Maintenance</h1><br/>Website under planned maintenance. Please check back later.
Lastly, Save your changes by clicking “Update File” and your WordPress maintenance mode will be enabled.
If you want to disable maintenance mode later, just remove the added code and save the file once more.
Conclusion:
So, here are the two ways to enable WordPress maintenance mode to inform visitors that your website is currently unavailable. Whether it’s using a WordPress plugin or adding custom code in a WordPress theme file, choose the one that suits your personal needs and technical skills. However, there are a lot of WordPress maintenance tasks you should perform regularly that don’t require maintenance mode.
If you face any difficulty during following this tutorial, leave a comment below. Also, let us know if you want us to write on some specific topics you have in your mind. We appreciate your further comments, support or suggestions!
In the end, if this article has helped you, then please subscribe to our YouTube channel to get more tutorials related to WordPress. You may join our Facebook page to update yourself with more tips, solutions, offers and so on.