Have you ever heard the term WordPress Multisite? What does it mean, how does it work, and how you can enable the Multisite network in your WordPress website!!
Well, it’s a powerful feature that offers to use and run multiple websites from just a single WordPress dashboard. It means you can manage multiple websites simultaneously that are separated on the front end but interconnected on the back end.
Sounds interesting! Right!
In this article, we will explain what WordPress Multisite is and why it’s such a helpful feature for your website. Then we’ll describe how you can enable the multisite network in the WordPress website.
So, let’s get started!
What is WordPress Multisite?
A WordPress Multisite is a built-in feature of WordPress that has been added to the WordPress core since WordPress 3.0 was released. It’s a way to maintain more than one website from a particular installation.
Moreover, it allows you to create new sites and organize them by one username and password. You can even permit other users to sign up for your domain and create their own blogs through the feature.
The amazing thing you will notice on WordPress Multisite is that Multisite network installation isn’t much more complex than the standard WordPress site, and updating the process is exactly the same on both of them.
All the themes and plugins in your network are downloaded only once, it does not matter how many sites you have used from them. It means the WordPress multisite consumes less space from the separate WordPress installation for each domain.
Now, Before enabling the Multisite feature on your website let’s find out what are the main advantages of using the Multisite Network.
Advantages of WordPress Multisite Network:
If you run more than one WordPress website then you may use the feature. Here we will point out some main advantages of using a WordPress multisite network.
- WordPress Multisite allows you to manage multiple WordPress blogs from a single dashboard.
- You can manage and activate themes and plugins for unlimited sites with just one click installation.
- It updates all the sites much more quickly than from the separate dashboard.
- It takes less server space than the regular WordPress installation because all the themes and plugins for all sites are downloaded only once.
- The exchange of data between network sites is much simpler and faster
- It is more efficient to keep your Multisite network updated than doing the same for multiple sites.
- It helps you to limit user access to some features including installing new plugins and themes. It’s a great option to manage a client’s website.
Now, What do you think? Are you wondering how you can grab the feature by enabling it on your WordPress Website?
Let’s give you the answer!
How to enable Multisite Network in WordPress?
There are a few simple steps you have to follow to enable the WordPress multisite. These are given below:
Step 1: Edit Your wp-config.php File
The first thing is to go to your web host and access your FTP (File Transfer Protocol) client like FileZilla. Then find the wp-config.php file add the following code and save the file.
define( 'WP_ALLOW_MULTISITE', true );
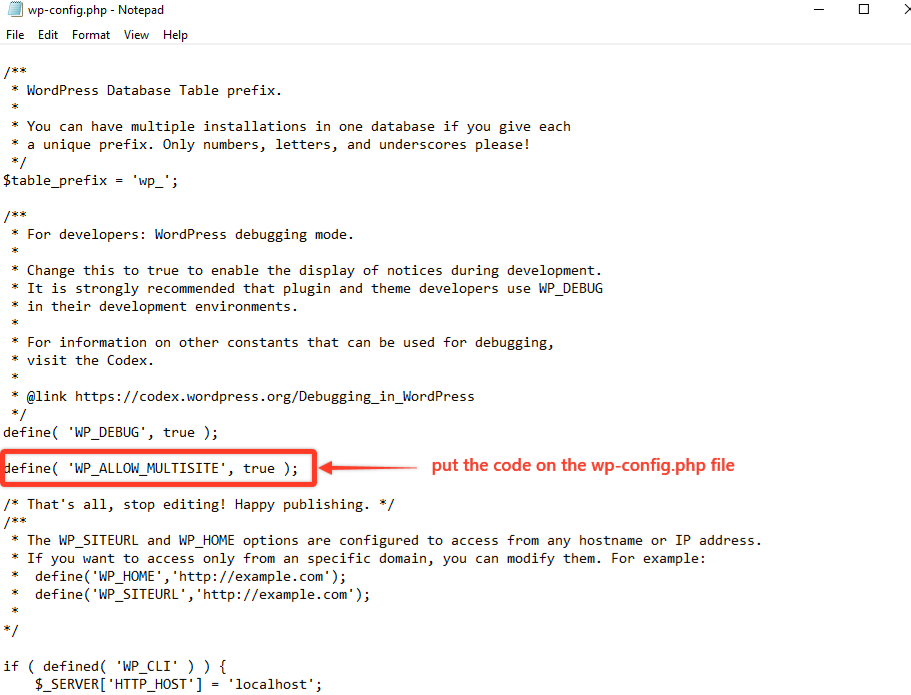
Before saving the file you have to make sure that this code must be pasted before the following lines,
/* That's all, stop editing! Happy blogging. */,
After saving the code you need to close the text editor.
Step 2: Setup Your Network
Now for the second step, you need to access your admin dashboard. Here you will see a new option that will appear on the tool tab named Network Setup. Now simply click on the Tool → Network Setup option and you will see a warning to deactivate all your plugins before enabling the network feature.
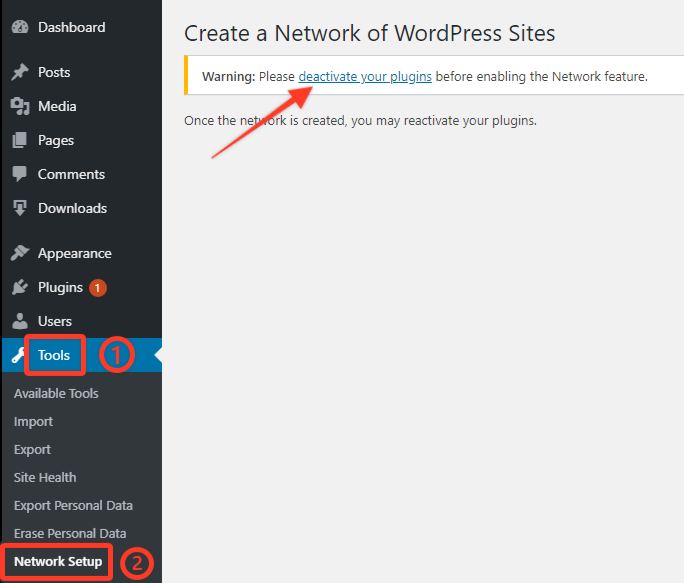
Don’t worry! Once the network is created, you can reactivate your plugin.
After deactivating all your plugins again go to Tools → Network Setup. Here you need to fill up the information of your network details for creating the network. First, choose the domain structure for your network as subdomains or subdirectories. Then add a title on the Network Title option and also a valid email address for the Network admin Email option.
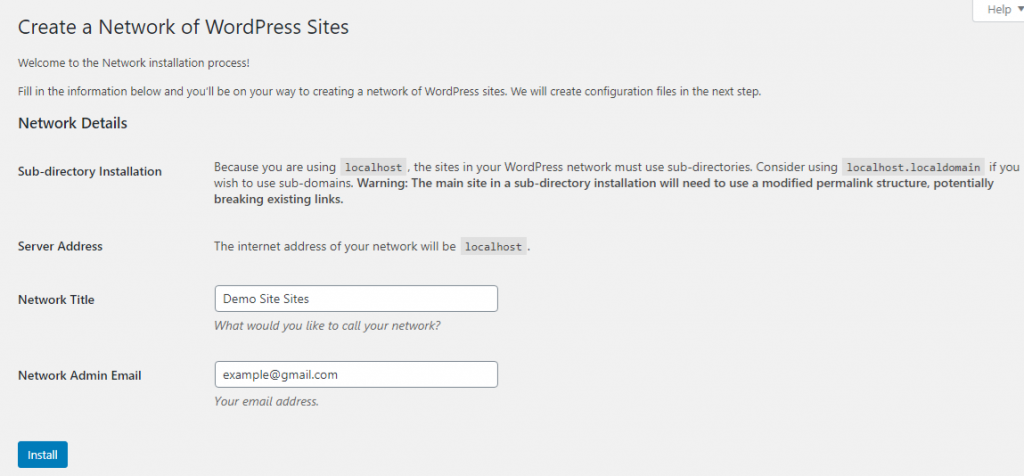
After putting all the information next click on the Install option.
WordPress will now give some steps to enable the feature. Here you need to add some codes to your wp-config.php and .htaccess files respectively.
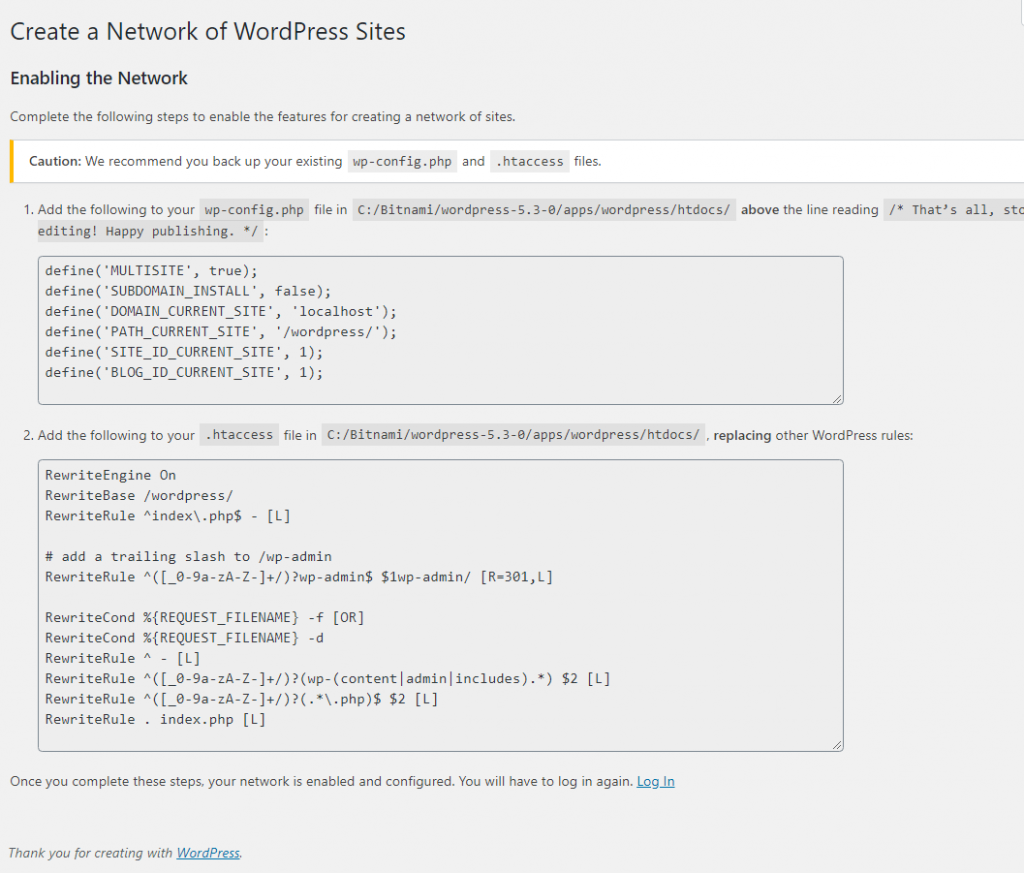
Now, copy the following codes open your cPanel, and then paste these codes according to the two files.
After that, save those files and re-login to your WordPress dashboard to access your new network.
Step 3: Enjoy The Multisite Network Feature
Now You need to log in to your dashboard again, and this time you will notice a new multisite dashboard on the top right. With it, you can start to add new sites, plugins, themes, and more to your network.
Wrapping Up
In summary, if you are managing multiple sites, the WordPress multisite network feature will help you to handle all your websites in a single interface which will definitely minimize your time from logging into multiple sites and also make your website management effective without any hassle.
Hopefully, this article will help you understand how to enable the WordPress Multisite feature on your website. To learn more about WordPress, you may check our WordPress Tips and How-Tos.
If this article will help you, please subscribe to our YouTube channel to get more tutorials related to WordPress. Also, you can join our Facebook page to update yourself with more tips, solutions, offers, and so on.
We appreciate further comments, support, or suggestions!