Custom Post Type is an additional tool that takes WordPress closer to a fully functional blogging platform. With the ability to create custom post types, you can manage your content and expand its functionality as well.
Do you know when you have to use it!!
Although there are lots of default post types that make your work more specific, sometimes your content doesn’t fit into the built-in post types. In that situation, you may need to extend the number of post types by creating a custom post type.
Well, in this article, we are going to describe what the custom post type means and how you can create it according to your requirements.
So. Let’s get started!!
What is a Custom Post Type?
The custom post type is another form of post that you build based on your needs. It helps to group your posts more specifically and also keep the posts in various types of buckets. Also, you may call them wherever you want.
For example, suppose you want to create a different section for Support for your plugin to your website. You may create a new type of item to your dashboard titled, “Support” by using a custom post type like the built-in Posts and Pages.
It’s extremely easy to add custom post types to WordPress because WordPress provides the core register_post_type feature that can be used to build them. Add more! These are also SEO Friendly because of their permalink.
Now take a look at how you can create a custom post type in WordPress.
How to Create a Custom Post Type?
There are two methods you can use to create a custom post type: by using a plugin, and by coding it manually.
To create the custom post type very quickly, you may use a plugin. But if the plugin you used is uninstalled or becomes inactive, all the types of posts you have made will vanish. Moreover, it will become difficult to access the data they hold from the admin region. So, We recommend you add it manually as it is the most efficient approach.
Creating A Custom Post Type Manually
Now, the first question that comes to your mind is, where should I add the code? Isn’t it?
Well, the best place to add your custom post type depends on your work.
If you want to add a custom post type on your active theme then you have to first create a child theme. Then you have to register your post type from there. Or, If you are building your own custom post type on your theme then you have to set the code in the functions.php file or in any other file called from your functions.php. And if you’re creating a plugin it really doesn’t matter where you add the code.
To create it for any particular theme for WordPress, you have to follow the following steps.
Step 1: Open the function.php file from the WordPress theme directory
At first, you have to navigate the function.php file and then add the following code to it.
function supports_post_type(){
    $labels = array(
        'name'                  => __( "Supports" , "supports" ),
        'singular_name'         => __( "Support" , "supports" ),
        'add_new'               => __( "Add New" , "supports" ),
        'add_new_item'          => __( "Add New Support" , "supports" ),
        'edit_item'             => __( "Edit Support" , "supports" ),
        'new_item'              => __( "New Support" , "supports" ),
        'all_items'             => __( "All Supports" , "supports" ),
        'view_item'             => __( "View Support" , "supports" ),
        'search_items'          => __( "Search Supports" , "supports" ),
        'not_found'             => __( "No Support Found" , "supports" ),
        'not_found_in_trash'    => __( "No Supports found in Trash" , "supports" ),
        'parent_item_colon'     => '',
        'menu_name'             => __( "Supports" , "supports" )

    );

    $args = array(
        'labels'                => $labels,
        'public'                => true,
        'publicly_queryable'    => true,
        'show_ui'               => true,
        'show_in_menu'          => true,
        'show_in_nav_menus'     => true,
        'query_var'             => true,
        'rewrite'               => array('slug' => 'support', 'with_front' => true),
        'capability_type'       => 'post',
        'has_archive'           => true,
        'hierarchical'          => false,
        'taxonomies'            => array('post_tag'),
        'menu_icon'             => 'dashicons-...',
        'exclude_from_search'   => false,
        'supports'              => array('title', 'editor', 'publicize', 'excerpt', 'custom-fields', 'thumbnail', 'tags', 'comments','author')

    );


    register_post_type('support', $args);
}

add_action("init", "supports_post_type");
You may copy the code above. You just need to change the name of the post name to your own custom post name.
The above code works in that it creates a post type support with an array of arguments. We all know, an array has two parts, the first part is labels, which itself is an array. The second part holds other arguments like archive or slug which will be seen in the URLs in this post type.
Step 2: Check your admin dashboard
After adding the code to the theme directory, you will notice that the “Support” type will automatically appear in your WordPress dashboard.
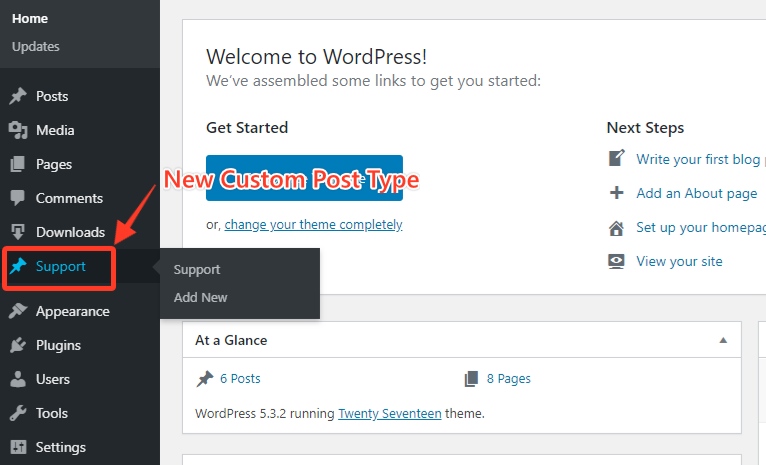
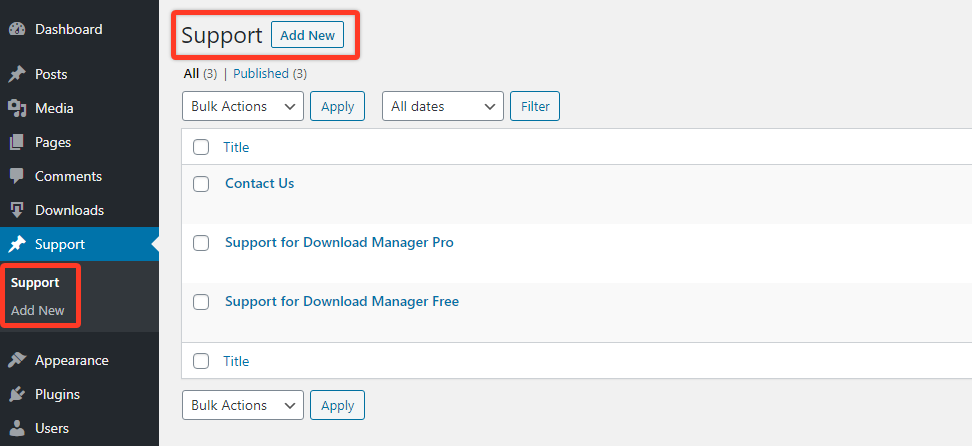
Since we set the Url as “supports” as slug so it appears on our website as below for custom posts:
http://yoursitename.com/support
That’s it. Now you have built your own new custom post type. You may change your permalink or edit the URL Structure according to your needs. Once you have created it, you are now viewing the menu entry for the post type, adding a post, publishing them, and then appearing on your website.
Creating A Custom Post Type Using Plugin
If you need a quick solution to create various custom post types for your website then a plugin is best for you in this situation. We recommend you use a free plugin named “Custom Post Type UI”. You have to just search for the plugin from the plugin library and install it. After installing the plugin, you have to configure your custom post type.
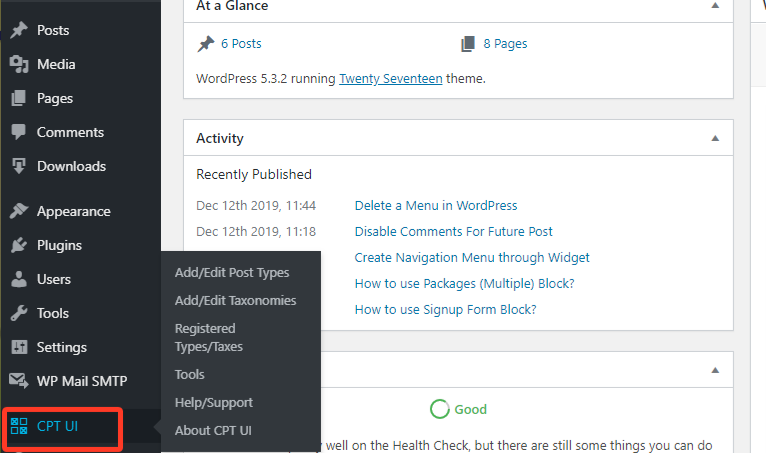
To do it, simply go to the newly created menu and new custom post type. Once you configure the new custom post type, you may choose the place where you can set it on your website.
Conclusion
As we have realized, if you have to organize more than one larger topic on your website, keeping track of them is going to be hard for you. That’s why WordPress provides the option to create a custom post type using manual or plugin.
But the truth is that it’s gonna be a little bit hard for the beginner to create it for the first time. But hopefully, this tutorial will help you if you will maintain all the procedures effectively. You may also ask any questions you have in the comment or want us to write on some specific topics you have in your mind.
To know more about WordPress, you may check our WordPress Tips and How-To’s to know more about WordPress. If this article will help you, then please subscribe to our YouTube channel to get more tutorials related to WordPress. You may join our Facebook page to update yourself with more tips, solutions, offers and so on.