
CSS is also known as Cascading Style Sheets. They give you complete control over the appearance of your WordPress site. They let you easily make any change in visual format whenever you want. CSS code is easy to use, edit, and maintain. But if CSS code isn’t delivered properly it could be a big problem. Because the WordPress site slows down when WordPress CSS delivery is delayed.
In this tutorial, we will learn 2 methods to optimize WordPress CSS delivery if they slow down. But before that let’s see how WordPress CSS code delivery can affect your site.
How Does WordPress CSS Delivery Affect Your Site?
Every WordPress theme contains a style.css file, some plugins may also have them. Moreover, sometimes site owners Add Custom CSS to their site. That means there is no WordPress website without CSS code. No matter how it is set up on your site, your CSS should help your web pages render fast instead of slowing them down.
When CSS does not deliver properly, the browser needs to process and download data before it finishes rendering your page. That means your users may experience a delay in seeing your page and may click off it because it does not appear to be loading. That small delay in site speed creates a bad user experience and may affect your SEO Ranking, causing less traffic and sales on your site.
Your site can slow down when your entire CSS files load before your site is rendered which means that users will see a blank white screen until then. This is called render-blocking CSS. The site can also slow down when CSS files contain more code than they need to display on the visible part of the webpage. That additional code takes a longer time to load.
You can improve your slow-down site’s performance by identifying the minimum CSS code needed to display on the first part of the current webpage. This is known as critical CSS. Also, by deferring your CSS files, you can allow the site to show up in the user’s browser before the stylesheets are finished loading.
2 Methods to Optimize WordPress CSS Delivery:
In this tutorial section, we will learn how you can optimize WordPress CSS delivery in two different ways. We will start with the easiest to the little bit critical ways (according to us), but you can choose the method that fits you the most.
1# Optimize with LiteSpeed Cache:
When it comes to the best WordPress caching plugin in the market, LiteSpeed Cache‘s name comes first. It offers the easiest approach ever to optimize WordPress CSS delivery.
So, the first thing you need to do is install and activate the LiteSpeed Cache plugin. Once activated, you need to navigate the “LiteSpeed Cache> Page Optimization” page and then shift to the “CSS Settings” tab.
In the “CSS Settings” tab, you need to turn on the “CSS Combine” feature.
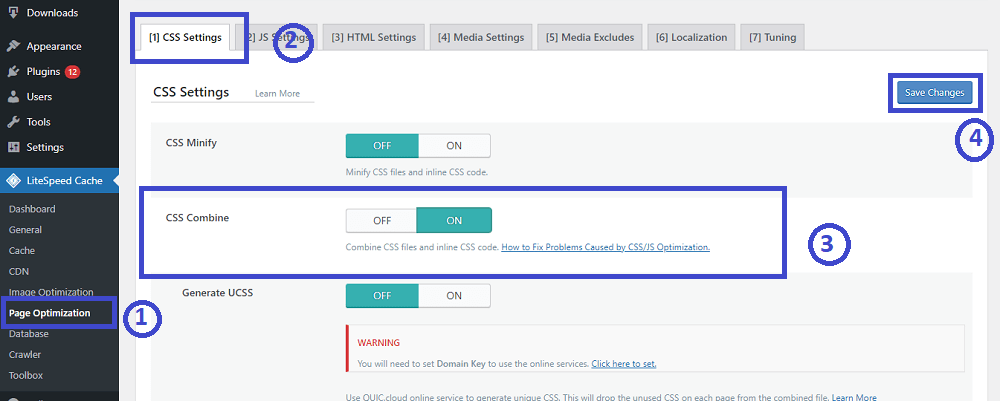
Once you turn ON the “CSS Combine” feature, LiteSpeed Cache will automatically find the CSS needed to style the parts of your site that visitors see first on the moment your site loads, and that code is added inline to the document. The pages your visitors see first will load more quickly, and the rest of the CSS will be loaded after.
Now, click the “Save Changes” button and wait for LiteSpeed Cache to produce the important CSS file for every post and page.
It will also automatically clear the cache for your website so that your visitors will see the new optimized version of your site.
In my opinion, this is by far the best and easiest solution for optimizing CSS delivery with WordPress.
2# Optimize with Autoptimize:
As Autoptimize is a free plugin, it doesn’t offer as many features as LiteSpeed Cache. The other thing is that Autoptimize takes more time to set up. However, it very good option if you don’t want to spend money on optimizing CSS delivery. But if you want more features in Autoptimize then it requires the help of a premium third-party service which is an additional cost and requires extra time to configure.
To optimize your CSS delivery, first, install and activate the Optimization plugin. Once you activated the plugin, navigate to the “Settings > Autoptimize” page. On that page, you need to scroll down to the CSS Options section, and then you will see 3 options “Optimize CSS Code?”, “Aggregate CSS-files?” and “Eliminate render-blocking CSS”. Now, check the “Optimize CSS Code?” and “Eliminate render-blocking CSS” options and uncheck the option “Aggregate CSS-files?”.

To store your settings don’t forget to click on the “Save Changes and Empty Cache” button.
Next Step of Autoptimize:
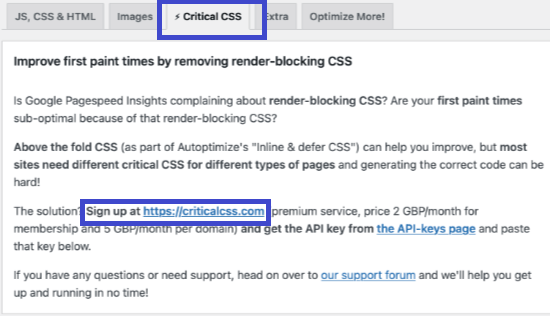
Unfortunately, this is not the end of this process. The plugin will not work properly until you sign up for a Critical CSS account. After signing up with a critical CSS account, the premium subscription service will provide the critical CSS code to Autoptimize that needs to optimize your WordPress CSS delivery.
To sign up, explore the Critical CSS tab in Autoptimize’s settings. Here you’ll find the information you need to sign up with Critical CSS. Click the signup link in the third passage to get started.
Now you might have received your Critical CSS API key, scroll down to the API Key section. Once you get the “Your API key” text box, paste the API key into it. Here again, don’t forget to click the “Save Changes” button.
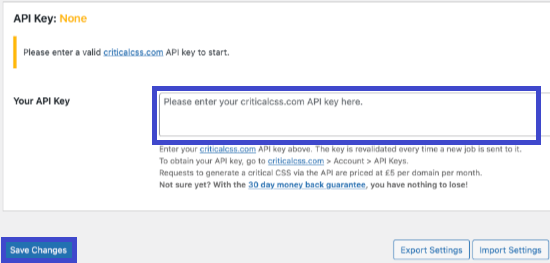
Now, the Autoptimize plugin has all the data that it needs to add to the critical CSS inline and defer loading the stylesheets until after the page has been rendered. Therefore, your WordPress site will load more quickly than before.
I hope this tutorial assisted you in figuring out how to optimize WordPress CSS delivery. Choose whichever method is handy for you. But our recommendation is to use LiteSpeed Cache. To speed up your site performance, you may also check the Top 7 Best WordPress Caching Plugins for Better Performance.
To get more tutorials and tips check our Blog page. Also, don’t forget to subscribe to our YouTube channel and follow our Facebook page.