Images are typically only a tiny proportion of the content on most web pages. But its sizes play a vital role in your WordPress site speed. They are one of the greatest causes of slow-loading web pages. They not only slow down the loading time, but they can also take up a lot of space and resources on your server. Moreover, you may experience traffic drops due to the slow speed of your WordPress website.
As images make up almost half of the file size of a webpage, even minor changes can be significantly impactful. Optimizing your images not only saves you space on your server but also ensures your pages are served faster.
WebP Images is a modern image format introduced and recommended by Google to improve loading speeds. It offers smaller image file sizes at a similar level of quality to existing image formats such as PNG and JPG. This makes your website load faster and saves bandwidth.
If you are still confused about WebP images, we’ll start with an introduction to the WebP image format, its pros & cons, and how to use WebP images on your WordPress site.
What is WebP?
As we mentioned earlier, WebP is a modern image format developed by Google to optimize images better than popular image formats. It was first introduced in September 2010 as a replacement for JPEG, PNG, and GIF while supporting good compression, transparency, and animations.
WebP focuses on delivering the same image file, just with smaller file sizes. By reducing the size of your image files, you can still give the same experience to your website’s visitors, but your site will load faster. According to Google’s data, WebP images are on average:
25-34% smaller in size than comparable JPEG images.
26% smaller in size compared to PNGs.
WebP supports lossy and lossless compression, so the exact reduction will depend on whether you’re using lossy or lossless compression.
- WebP lossy images are encoded using predictive coding. It decreases file size by using the neighboring pixels to predict the values and then only encodes the differences. Using WebP lossy compression, images can be up to 34% smaller than the comparable image as a JPEG.
- WebP lossless uses a much more complicated set of methods that were developed by the WebP team. Its robust images recreate new pixels from previously observed image fragments. If it doesn’t find a match it can use a local palette. Lossless images are 26% smaller than the same image as a PNG. Lossless WebP endorses alpha channel (transparency) and has a file size that is three times smaller than a similar PNG image.
A WebP file contains VP8 or VP8L image data and a RIFF container. It saves files with the extension ”.WebP”. The libwebp library is the WebP spec’s reference implementation. The library is available as a tarball or in the new folder.
Since WebP is a new file format, it is not yet supported by all browsers. However, most modern browsers like Google Chrome, Firefox, and Microsoft Edge support WebP images. Also, WordPress 5.8+ supports WebP.
WebP: Pros & Cons
For now, let’s take a look at the WebP pros and cons and see if it’s right for you and your needs.
Pros:
- WebP is a web-focused image format.
- Need fewer media storage.
- Speed up website loading time.
- Reduce the image file size, but the quality stays the same.
- WebP can free up bandwidth space.
- Support transparent images.
- Has smooth color gradations.
Cons:
- Not all browsers support WebP.
- Human faces can take a posturized appearance at low settings.
- Poor exporting interface.
Use WebP Images on WordPress:
As a WordPress user, you have several excellent image compression and optimization plugins and tools. In this section, we will talk about the three most popular plugins for enabling WebP images on your WordPress site.
Method 1-Use WebP Images with EWWW Image Optimizer:
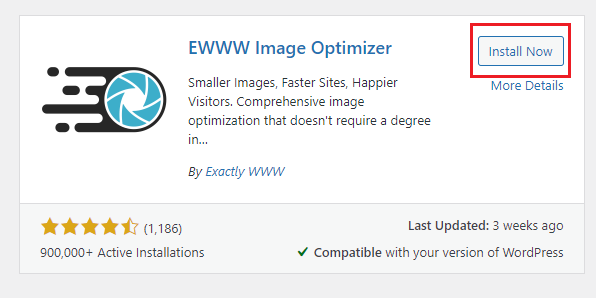
EWWW Image Optimizer plugin is a solid choice for serving up WebP images on your website. It is a free plugin with a WebP conversion feature. It generates WebP versions of your JPEGs and PNGs. This one is probably the easiest to use and one we recommend for converting your images to WebP. The built-in WebP features let you use lossy conversion for JPEGs and lossless for PNGs, and the conversion is automatic. To get all these features first thing you need to do is install and activate the EWWW Image Optimizer plugin.
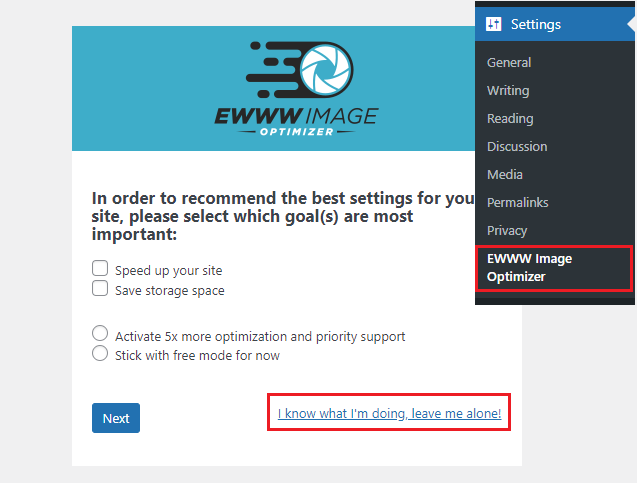
After activation, click “Settings > EWWW Image Optimizer” to configure the plugin. A setup wizard will appear, click on the “I know what I am doing” to exit the wizard.
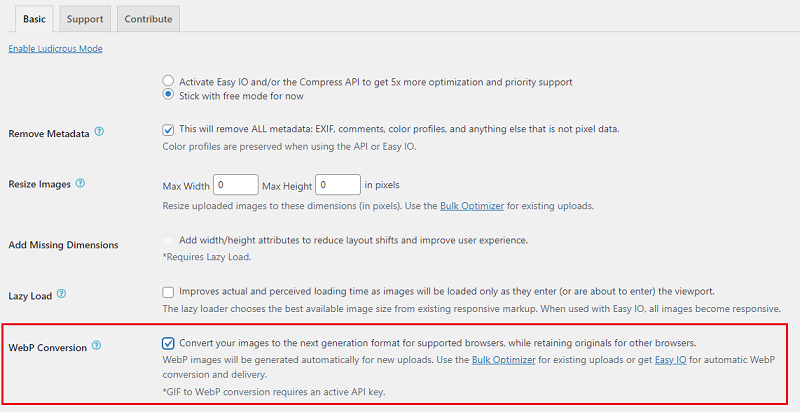
On the directed page, you will see many options. Scroll down and check the box next to the “WebP Conversion” option.
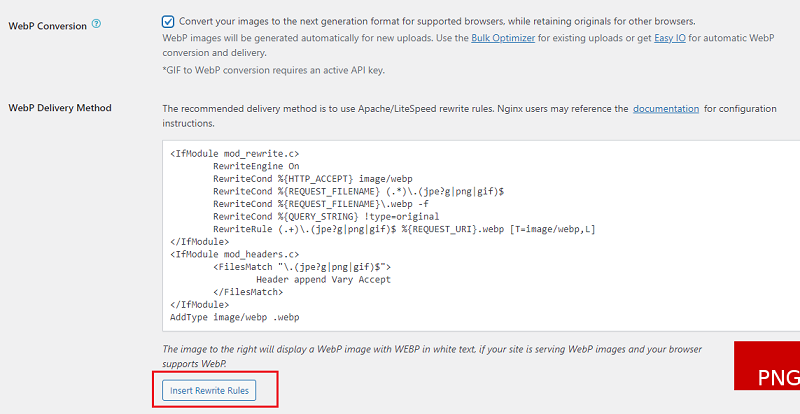
Now, you will see some rewritten rules with a red preview image. Click on “Insert Rewrite Rules” to insert these rewrite rules. If the preview image turns green, then this means you have successfully enabled WebP image delivery on your WordPress site.
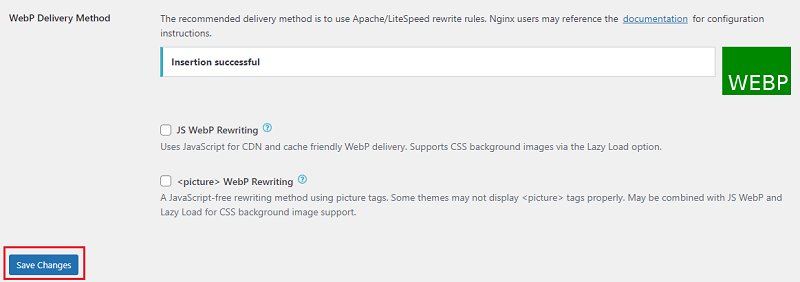
In case of unsuccessful insertion, copy the rewrite rules and paste them into your “.htaccess” file manually. Return to the plugin’s Settings page and click the “Save Changes” button once again when you’re finished.
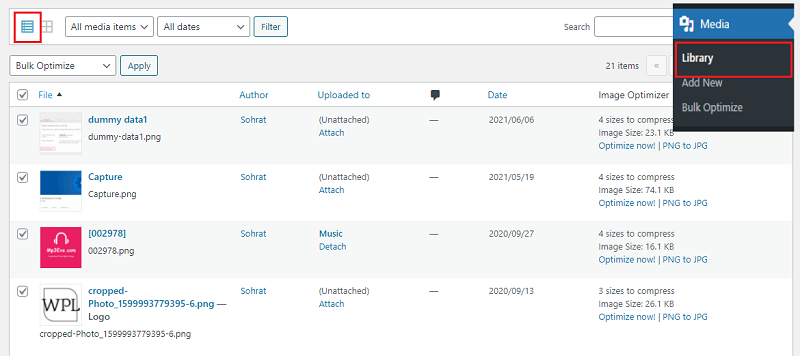
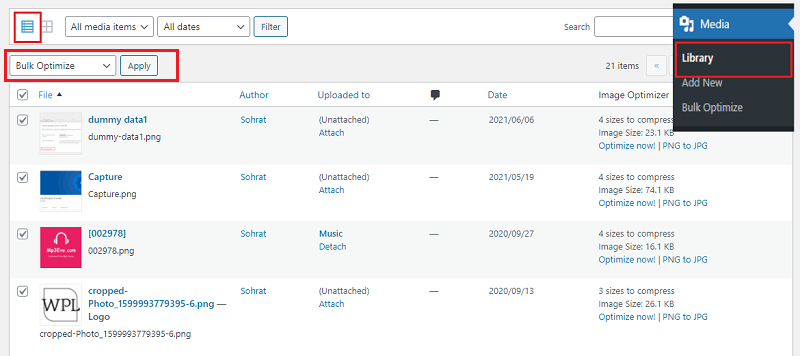
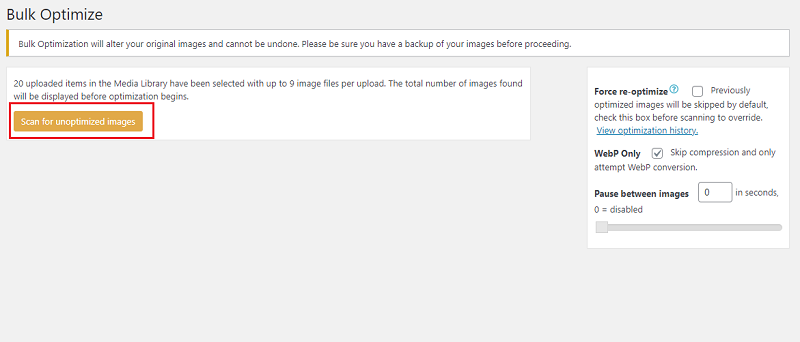
You can also easily convert your previously uploaded images to WebP images with EWWW Image Optimizer. To do that, go to the Media > Library page and switch the view grid to list. Now, click Bulk Optimize from the Bulk Actions drop-down box and press the Apply button.
After that, click on the ‘Scan for Unoptimized Images’ button to continue. The plugin will then show you the number of images it found, so you can click on the Optimize button to proceed.
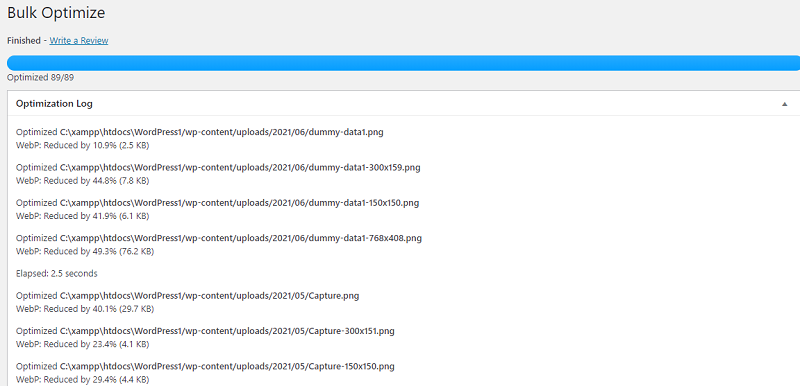
EWWW Optimizer will optimize your images and create WebP versions of them.
Method 2-Use WebP Images with Imagify:
Imagify is a very powerful and lightweight plugin to allow WebP compression in WordPress. After enabling Imagify, you can automatically upload and convert all your images, including thumbnails, onto your WordPress site. Imagify is free but it does have a cap on how much optimization you can do. Currently, users can use up to 20MB worth of optimization for free every month. After that, paid plans start at $4.99 per month for up to 1 GB or $9.99 for a one-time credit of 1 GB.
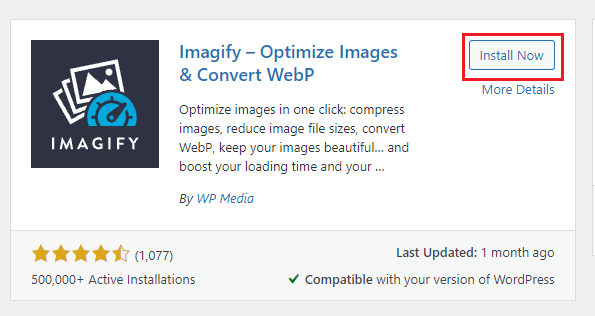
To get started with Imagify, install and activate the Imagify plugin.
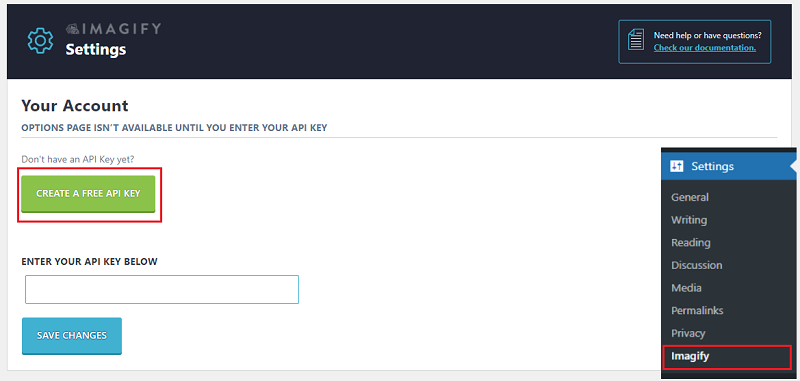
Once the plugin is installed and activated, click on “Settings > Imagify”. After clicking Imagify from the Settings menu, a configuration page will appear. Now you need to create an API to use the Imagify plugin. To do this, click on the “Create a Free API” button.
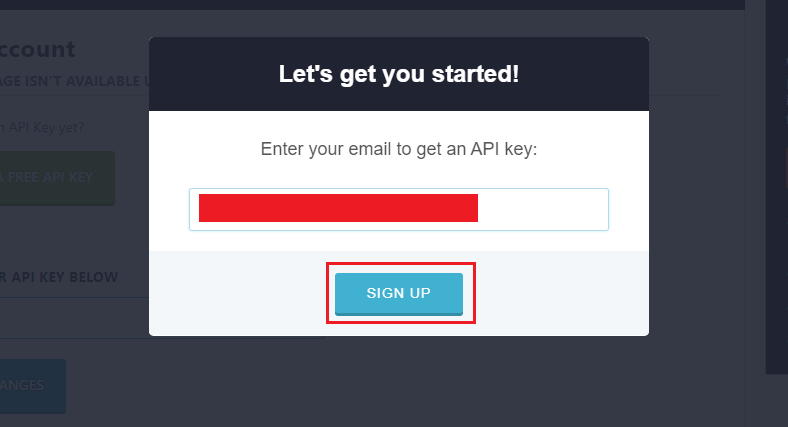
On the next page, you will see a box to enter an email address after that you can check your inbox for an email containing your API key. Copy and paste the key and click on the “Save Changes” button.
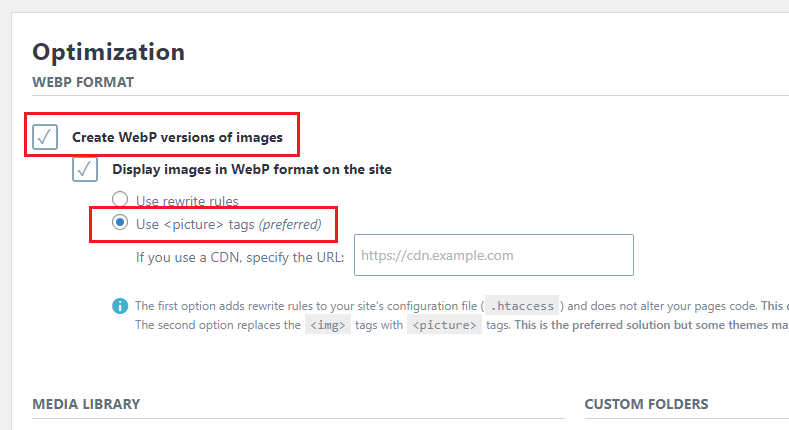
Now, you need to enable the option to display WebP images. For that, you need to scroll down to the Optimization section and check the options next to “Create webp versions of images”.
Below that, you can choose from two delivery methods to display WebP images in WordPress. The first one is the “Use rewrite rules” method, and the second one is “Use <picture> tags”. The <picture> tags method might cause issues with some WordPress themes but in most cases, this method is the preferred one. However, if you notice any problems with your theme after enabling WebP images, you can switch to the “Use rewrite rules” option.
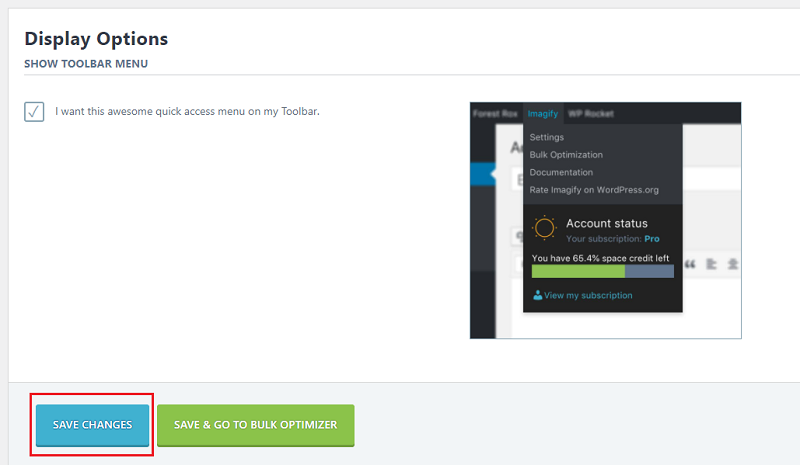
Last but not least, you will see “Display Options”. There is only one option, so check the box if you want it. Click on “Save Changes” when you are finished and you are set and ready to get WebP images in WordPress. If you want to convert your previously uploaded images into WebP format, click the “Save and Go to Bulk Optimizer” button for bulk conversion.
Method 3- Use WebP Images with ShortPixel:
ShortPixel is a freemium service. It offers a limited free plan that allows you to optimize 100 photos each month. After 100 photos, you have to pay $4.99/month for up to 5,000 images per credit. Another option is to pay $9.99 one-time for a bundle of 10,000 credits after that. In terms of features, ShortPixel and Imagify share a lot of similarities. The most significant difference comes when you look at pricing. Whereas ShortPixel charges you based on images with no size limit per image, Imagify charges you based on overall file size, with no image limit.
To use ShortPixel, install and activate the plugin.
After activating the plugin you will be redirected to a page where you need to add an email id to get an API key. Add the API key to your WordPress site.
Next, go to “Setting > ShortPixel”, You will get several tabs for setting ShirtPixel there, open the “Advanced” tab. To display webP Images, scroll down and check the box “Next Generation Images”. Also, check the box “Deliver the next-generation versions of the images in the front-end”. Now, another section will appear, select the radio button named “Using the <PICTURE> tag syntax”.
Lastly, click the “Save Changes” button to save the changes you made.
Conclusion:
To use WebP images on your WordPress site, you have many options. However, these three plugins are the best options according to our personal experience with all of them. Which one is your favorite WebP image optimization plugin to use? Have you tried more than one? Let us know in the comments section!
If you liked this article, please check our Blog page. You can also subscribe to our YouTube Channel for WordPress video tutorials & follow us on Facebook.