
WPDM – ConvertKit
Version 1.1.0 Download 21 File Size 2.26 KB File Count 1 Create…

WordPress Download Manager Directory Add-on will help WordPress Download Manager users to show all categories and downloads on a single page with different styles.
Upload/Install from Admin Menu Plugins Add New Upload, Just the same way as other WordPress plugins.
[wpdm_archive button_style="default" template="link-template-default" cols=1 items_per_page="10" orderby="title" order="ASC" login=1 last_state=0]
[wpdm_archive_compact template="link-template-default" cols=2 colspad=1 colsphone=1 items_per_page="10" orderby="title" order="ASC" login=1]
[wpdm_archive_simple template="link-template-default" cols=2 colspad=1 colsphone=1 items_per_page="10" orderby="title" order="ASC" login=1]
[wpdm_archive_flat orderby="title" order="ASC"]
Use the shortcode inside page or post content to show directory like interface for WordPress Download Manager
— buton_style: `default` or `success` or `info` or `warning` or `danger` or `primary` or `secondary`
— template: any link-template ID( optional parameter )
— category: use any category slug here if you want to create an archive page for that specific category or don't use the parameter
— include_children: if you use category parameter, on initial load, it only will fetch the packages from the mentioned categories, if you want to include packages from sub-categories too, you must use include_children=1.
— orderby: `package_size_b` or `date` or `modified` or `download_count` or `view_count` or `title`
— order: `asc` or `desc`
— order_fields: optional parameter, you can use this option if you want to edit order fields dropdown options. Ex: order_fields="date:Date|title:Title|modified:Last Updated"
— login: 1, use this parameter if you want to make the shortcode members only / login protected. Otherwise, you may skip this parameter.
[wpdm_categories] - Use the shortcode inside page or post content to show all categories
[wpdm_categories orderby="name" order="DESC" subcat="1" showcount="0" cols=3]
— orderby: how the retrieved terms should be sorted:
— order: ASC or DESC
— subcat: Show ( 1 ) or Hide ( 0 ) sub-categories
— subcat: Show ( 1 ) or Hide ( 0 ) sub-categories
— showcount: Show ( 1 ) or Hide ( 0 ) number of packages in a category
— cols: Number of columns
[wpdm_tags btnstyle="link" icon="tag" showcount=1 cols=3]
— showcount: Show ( 1 ) or Hide ( 0 ) number of packages in a category
— cols: Number of columns
— icon: Font awesome icon
— btnstyle: Button style, possible values: link | secondary | primary | success | info | warning | danger
[wpdm_category_blocks categories="slug1,slug2..." cols=4 button_color="green|blue|purple|primary|info|warning|danger|success|#colorcode" hover_color="primary-hover|info-hover|warning-hover|danger-hover|success-hover|#colorcode"]
— categories: Category slugs separated by comma
— cols: Number of columns, 1 or 2 or 3 or 4 or 6 or 12
— button_color: Block color scheme, use any of the pre-defined colors ( green, blue, purple, primary, info, warning, danger, success or color code like #339966
— hover_color: Block hove color, use any of the pre-defined colors ( green, blue, purple, primary-hover, info-hover, warning, danger-hover, success-hover or color code like #339966
Generates advanced search and filter page:
[wpdm_archive_filter items_per_page="12" template="link-template-default" cols=1 colspad=1 colsphone=1]
— template: any link-template ID ( optional parameter )
— category: use any category slug here if you want to create an archive page for that specific category or don't use the parameter
— include_children: if you use category parameter, on initial load, it only will fetch the packages from the mentioned categories, if you want to include packages from sub-categories too, you must use include_children=1.
— orderby: `package_size_b` or `date` or `modified` or `download_count` or `view_count` or `title`
— order_fields: optional parameter, you can use this option if you want to edit order fields dropdown options. Ex: order_fields="date:Date|title:Title|modified:Last Updated"
— order: `asc` or `desc`
— login: 1, use this parameter if you want to make the shortcode members only / login protected. Otherwise, you may skip this parameter.
— cols: Number of columns, 1 or 2 or 3 or 4 or 6 or 12 ( optional parameter )
— colspad: Number of columns in tabs/pads, 1 or 2 or 3 or 4 or 6 or 12 ( optional parameter )
— colsphone: Number of columns in phone, 1 or 2 or 3 or 4 or 6 or 12 ( optional parameter )
— sidebar: left or right
additionally, there is a search box widget for searching downloads.
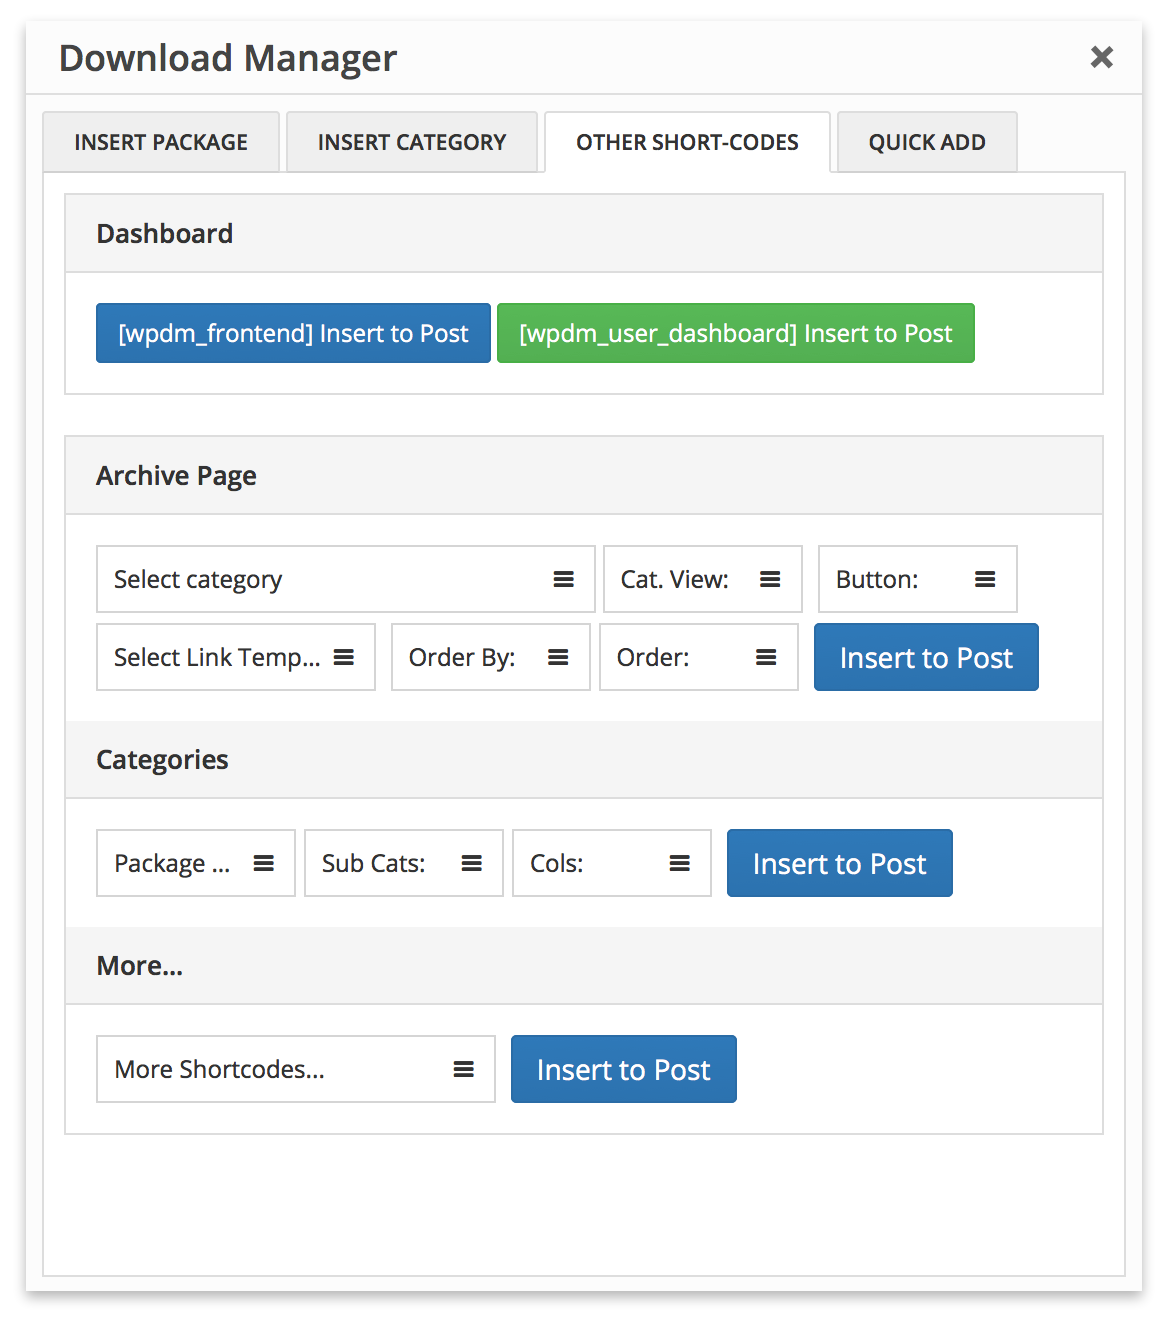
Please use WPDM Gutenberg Block Add-on or Advanced TinyMCE Button Add-on to generate short-codes properly, short-code options are marked in the following image:
If you want to customize a view in your own way, you need to edit template files inside /plugins/wpdm-arhive-page/src/Templates/****/views/ dir. Please follow the following steps to edit a template file so that the new update doesn't erase your changes:
download-manager/wpdm-arhive-page/**** inside your active theme directory if it is already not there. Here replace **** with simple or flat or filter or compact, depending on the template dir name, from where you are moving the template file./wpdm-archive-page/src/Templates/Filter/views, you need to place it in {active-theme-dir}/download-manager/wpdm-arhive-page/filter/{active-theme-dir}/download-manager/wpdm-arhive-page/**** dir as per your needWPDM Directory Add-on demo links:
Version 1.1.0 Download 21 File Size 2.26 KB File Count 1 Create…

Amount To Pay $ Minimum: $10.00 Add To Cart Version 1.0.0 Download…

$49.00 — $99.00 Select License Pro For single installation $49.00 Developer Up-to…
Price: $[price] $99.00 — $499.00 Select License Pro For single installation $99.00…
87 Comments
Hi team, One issue I’m finding is that when at page view after pressing the “+” icon it doesn’t appear in the cart. What am I missing? Using this shortcode which displays well for me. [wpdm_archive_flat orderby=”title” order=”DESC”]
Thanks for the support.
Disregard. Posted to private ticket.
Hi, I need to get support to show the left sidebar with the category when clicking the primary menu
please post in forum https://www.wpdownloadmanager.com/support/forum/download-manager-pro/
how to show the left sidebar with the category on the front
Hello,
Hello,
I have some important observations about how the tool works.
Using the shortcode model “wpdm_archive_filter” I noticed that the tags registered in the posts are not displayed in the “Tags” field. Another observation is that in the “Categories” field, when there are more than three ascending categories, the order of the options is misconfigured.
Using the shortcode “wpdm_category_blocks” it is not possible to create a visualization of a category within the other as in the example: “Main category > Subcategory > …”. When accessing the main category, the subcategories do not appear.
Tags with wpdm pro is different from regular post tags. And may you please explain your category observation a little more.
HI, I need to get support to install dummy content & child theme similar to your demo
Please post in forum https://www.wpdownloadmanager.com/support/forum/download-manager-pro/
Hello there,
we just purchased a developer license for this add on.
The installation & activation were done without a problem.
However the shortcode we wish to use on a page is not being converted at all.
wpdm_archive_filter
Did we miss a step in the process?
Please post in forum https://www.wpdownloadmanager.com/support/forum/download-manager-pro/
Hello,
Are we able to create multiple directories based on different parent categories instead of one directory page?
I have a few issues with the shortcode [wpdm_category_blocks]. Can we:
1. Add an option to list all categories
2. Add an option to hide category if no files exist.
It is a pain to update this thing every time I have a new category to display.
Noted for implementation.
Hello!!
Just wondering it would be possible to get the shortcode of the following layout “Category Blocks:
See link here:
https://demo.wpdownloadmanager.com/wpdmpro/category-blocks/
Thanks!
You can also use Gutenberg block https://www.wpdownloadmanager.com/download/gutenberg-blocks/
Hi,
The shortcode is documented on this page above:
Hello.
I want to display the page archive default view like this type: http://prntscr.com/unmu7n
Would you please guide me for a shortcode and steps?
Thank you.
hello.
I had made some changes on wpdm-archive-page.php , ¿how do i include this in my child theme? I tryed to put the file in themes/my-theme/cownload-manager but is not working, just works in plugin directory .
¿any idea?
`wpdm-archive-page.php` is the core plugin file, only template files in `tpls` are customizable in that way. However, please let me know what did you change.
My changes are just for made compatibility with wpdm_user_access.
my code just filter all wpdm categories and get the ones are allowed by wpdm_user_access for current user and not allowed, them i use not allowed array to ‘exclude’ these wpdm categories from lists and dropdowns.
I did not find another way, i tryed with pre_get_posts filter but could not made it, so that why i did it directly in wpdm-archive-page.php.
Hi, I´m using this code to display some Categories of my downloads:
[wpdm-archive category=”3640,3639,3638″ cat_view=”sidebar” subcat=”1″ button_style=”success” link_template=”link-template-calltoaction3.php” order_by=”post_title” order=”desc” items_per_page=”12″ ]
I´m searching for a possibility to avoid the breadcrums on top of the list once I choose a category! I just want no Breadcrumbs in any of my download-views. Breadcrumbs in Yoast or my divi-theme are disabled, so I think it must be changed in the archive-module or in the downloadmanager itself, mustn´t it? Thanks, your help is much appreciated
Use the following css code to hide breadcrumb:
.w3eden .breadcrumb {
display: none;
}
Man, you´re my hero. I was looking for this “switch” a long time and now its solved within the blink of an eye. Maybe there could be a option in the settings in a future update for all the people who may also be interested in this feature.
Thanks again, you made my day 🙂
Since updating to the new UI I can no longer access the shortcode generator to use the new UI. I am very keen on using “Advanced Search ( Left )”. How do I now use this?
Shortcode for Advanced Search ( Left ):
`[wpdm-search-page cols=”1″ items_per_page=”10″ link_template=”panel” position=”left”]`
need Archive Page Compact shortcode
Hi,
iam using de free plugin with the directory add on. I’m using this shortcode: [wpdm-archive button_style=”default” link_template=”link-template-panel” items_per_page=”10″ category=”category-slug” order_by=”asc” cat_view=”compact”]
but i’ve got many white spaces and incorrect spacing. See; https://agrarischekinderopvang.nl/Schermafbeelding%202019-07-22%20om%2015.15.15.png
can you help me?
It was because, while you were copying the shortcode, there also copied extra HTML tag
<pre>. Remove the<pre>tag around the shortcode and formating will look okay.Will this plugin allow you to show both categories and files together? For example if I have a directory with both sub-directories and files in the parent directory, will it show up in this way?
Hi,
Please check the demo link at the bottom of the item description, all possible ways to are demonstrated there.
Hi team.
I would like to have an archive page like the Archive Page Default https://demo.wpdownloadmanager.com/wpdmpro/archive-page-default/
But the Advanced TinyMCE Button Add-on does not display in the Pro themes page editor.
It would be nice that you publish the shortcodes and settings to achieve your demos…
The shortcode is used there is:
I need to exclude categories, how can i do ?
Thank-you for support
in wpdm-archive
hello,
Is posible hide the all files list and only show files when the user clic on a especific category?
thanks
Hello .
Where’s kind of changed files, such as grid
Hello! Do you think it’s possible to do something like this (http://www.intelbras.com.br/downloads) with WP Downloads Manager? What is the demo that is more similar do this, and what should I buy to accomplish this?
Probably you are looking for this: https://www.wpdownloadmanager.com/download/wpdm-accordion/.
Yes, you will need developer license for both, main plugin and all add-ons pack to use with unlimited sites.
Another question: If I buy the All Addons Pack for unlimited sites, do I need to buy the Developers License for the main plugin?
sry code not passed :
echo do_shortcode(‘[wpdm-archive cat_view=”compact” category=”conception” button_style=”success” link_template=”58b6f00b8dae9″ order_by=”post_title” order=”asc” items_per_page=”10″]’);
seem not working in my theme. I have the filters but no content.
Hi, is it possible to make an advance search also by tags and not only by category?
Many thanks
Sorry, not yet. But it is in our to do list.
The parameter cat_view isn’t showing up in the shortcode listed in the “usage” section on this page. How do I set the menu structure to be Archive Page Sidebar?
Thanks for your help.
Nevermind! Downloaded the TinyMCE button that solved it!
Thanks
Massive problem…. using this addon however url /?wpdmtask=get_downloads&pg=4626&category=&cp=26 renders an un-styled page where all protected files are downloadable without being logged in / or having the correct access. Please help… i can email you the link and admin login in private… dont want to share here for privacy reasons! please HELP… my client is losing their mind and may get sued becuase of this!!
We shall add
rel="noindex nofollow"attr with the next update, please use support forum https://www.wpdownloadmanager.com/support/forum/download-manager-pro/ for faster response.Is it possible to hide the number count next to each category?
Hi, it seems like the shortcode doesn’t totally work in a text widget?
Great add on, much better for larger quantities of downloads. I had a few questions:
1) Is it possible to hide/remove the two ‘Order By’ columns in the Compact layout? I do not want to have that functionality.
2) Can I rename ‘Packages’ to ‘Downloads’ anywhere?
3) For some reason, subcategories are displaying beneath a particular main category when using the Compact layout. I do not want them to show. Could this be because they are three levels down (main>secondary>third)?
Thanks!
I just noticed that all of my subcategories are listed. Can I change this at all?
Hi, How can I change the default display to ASC instead of DESC? Even if I use order=”asc” in the shortcode it still defaults to descending order.
Use tinymce button to insert shortcode. There might be some error in your shortcode.
What is the shortcode for your example http://demo.wpdownloadmanager.com/wpdmpro/archive-page/
I have tried using the TinyMCA plugin and cannot replicate your demo
Please update plugin, now you will be able to select category view too, also updated usage in the description above too.
Is it possible that when you click a category the list that appears respects the order by you put into the shortcode?
Sorry, no, it will take the order parameter from the dropdown next to search box.
Is there a way to turn off the default list and just have the category buttons until someone clicks one?
Not yet, but noted for implementation.
How can i show nested folder structures? I want to see the subfolders of the folder when I click on it and then in the subfolders there are the files.
You need to use short-code [wpdm_tree] ( First install and activate extended short-code add-on: http://www.wpdownloadmanager.com/download/wpdm-extended-short-codes/ )
thanks for the quick response: when i add “[wpdm_tree]” to any page. nothing will show up in the frontend. the extended short-code add-on is enabled.
is there any setting i need to set when i want to use [wpdm_tree]?
Actually I don´t want the functionality as it´s in the [wpdm_tree] example. I want a list of all categories and when i click on a category i want to see the subcategories without the parent once. and if i click on a subcategory i want to see the files which are in that subcategory.
How do you update the paid version of this plugin? I see the announcement that 2.6 is available but just takes you to wpdm home page.
You simply need to download it again from your orders page ( http://www.wpdownloadmanager.com/purchases/ ) to get the latest version.
you do not see the files of the second language, instead WPDM-downloads-all he did. How to fix it?
Thanks net9design. I solved it by changing the code because I did not want to upgrade my version to avoid errors that can cause an update.
in var/www/vhosts/mysite/httpdocs/wp-content/plugins/wpdm.archive-page/wpdm-archive-page.php on line 1043 (Parse error)
Hi Costanzio – I got the same message but updated my version of PHP to 5.4 and all working ok now. Hope this helps
error installation Directory Add-on: “syntax error, unexpected T_FUNCTION, expecting ‘)'”
you need to upgrade your server php version to 5.4+.
hi, you can go any do a search for tags associated with the file as well as searching by name? Thanks.
Ok, I’ll add the option with next update
Is there shortcode for the examples given in the demo?
please download and install this add-on http://www.wpdownloadmanager.com/download/advanced-tinymce-button/ , you can generate all short-code using that add-on, as soon as you install any new wpdm add-on, the new short-code option will be hooked with wpdm tinymce button add-on automatically.
Hi Shaon,
It seems I can’t use
[wpdm-tags cols=”1 or 2 or 3 or 4 or 6″ icon=”font-awesome-icon-name-only, for example: tag, cube, check…” btnstyle=”primary | default | warning | success | info”]
to generate anything.
Could you please advise ?
Thank you.
You need to try like this:
[wpdm-tags cols=”4″ icon=”tag” btnstyle=”primary”]
wheere is the demo of this plugin?
Is the Directory add-on included in the All Add-Ons pack?
I did not see it listed in the discription.
Yes, Directory Add-On is included in All Add-ons bundle (wpdm-archive-page.zip)
hi, can i use WPDM Directory Add-on in the free version of the wdm?
Yes, you can.